How to prepare for your debt management plan review
So your debt management plan (DMP) has been ticking over nicely. Hopefully your...
Decorating a house is expensive, and that’s before you sort out all of the finishing touches that make your home more homely. Over the next couple of weeks I’m going to look at ways to fix up your home on a budget, starting with the kitchen.
I’ll admit it, my kitchen is pretty boring! It tends to get a bit forgotten when it comes to decorating and adding some personality.
I’ve scoured the web for straightforward, thrifty DIY solutions to brighten up your kitchen on a budget. There’s a load you can make with things you already have around the house; just add a bit of imagination!
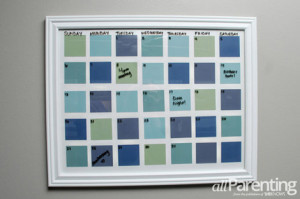
The kitchen tends to be one of the most sociable rooms in the house, so it’s a great place to put a calendar to keep track of everyone’s plans.
Source: allparenting.com
This calendar is tried and tested, and I find mine so useful I wanted to share the idea. Not only will it add some colour to your kitchen but it’s also fun to use (yes, really!). What’s more, it’s dry-erase so it’s perfect to keep track of changing plans.
You’ll need an A4 photo frame, a sheet of A4 paper, double sided tape and paint colour charts (the sort you get free in the paint aisle in home improvement or DIY shops). Why not personalise your calendar with photos, or add a ‘notes’ section at the end for scribbling messages to the people you live with?
If you have some paint colour charts left over, don’t throw them away! They’re so versatile and can be used to make all sorts of useful household items (some you don’t even know you need!). From jewellery and greetings cards to wallpaper and wallets, here are another 50 ways to decorate your home on a budget with them.
So you’ve made your calendar, but where will you keep the pens?! Take an old spice tin (you can get them in your local supermarket or buy them on etsy.com – starting at around £2 each) and put a small magnet inside it at the back. The magnet should stick to the tin by itself, so there’s no need for glue. Fill it with stationery, put it on a magnetic surface and ta da! You’ve solved the age old problem of never having a pen to hand and brightened up your fridge at the same time.

Source: marthastewart.com
I like the idea of using spice tins because they tend to be quite bright and there’s no need to use sticky adhesives, but it could be any container you like. You could also use it to store other household items like pegs or elastic bands.
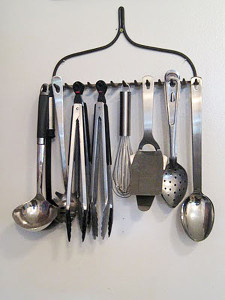
If you’re sick of rummaging around in kitchen drawers and reaching to the back of shelves, there’s a solution hiding in the most unlikely of places.
What with the invention of leaf blowers and new-fangled mowers, the good old garden rake rarely makes an appearance. Why not take it out from the shed and put it to good use in your kitchen? The rake’s prongs make for a great storage solution.
Take off the handle, clean up the rake, nail it to the wall, and you’ve got a handy utensils holder or even a wine glass rack. Thrifty and practical!
Source: decoratingfiles.com

Source: recyclart.org
If you’ve got an old set of wooden nesting dolls that have seen better days, why not make them into quirky salt and pepper shakers? Use a push pin to mark their heads with where you want the holes to go, drill through with a 1/16-inch (1.58mm) bit, and fill them with salt and pepper.

Source: stilldottie.blogspot.co.uk
You’ll need five or six left over wine bottle corks, a sharp knife, a needle and thread, a hammer and nail, and some PVA glue. For step-by-step instructions on how to make the trivet, take a look at this guide.
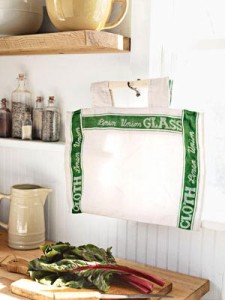
When the Government recently announced plans to introduce a 5p charge on plastic bags in all supermarkets as of October, I realised I need to stop adding to the mountain of supermarket bags that takes up one of my kitchen drawers! This idea for a thrifty DIY shopping bag is practical and will save you money over time. All you need is an old tea towel and two wooden spatulas!
Source: countryliving.com
For more handy money-saving tips and budgeting advice, sign up to our monthly MoneyAware newsletter.
Keep an eye out for my next blogpost in this series, when I’ll be looking at DIY ways to revive your living room on a budget.
In the meantime let us know in the comments if you have any DIY tricks you’d like to share!